Last year I made my younger son a Skylanders Floating Island Cake for his birthday. It was a huge success, so I had my work cut out to top it this year!
Having already made a Skylanders Portal of Power and a Minecraft Diamond Sword for his big brother, I wondered aloud on Facebook as to what I could make this time. A friend suggested a Minecraft TNT cube, which I had already been considering, but a piñata version.
I was sold!
*This post may contain affiliate links*

To make this Minecraft TNT cake you will need:
Square cake tin/pan
Cake mix, enough for four layers
Frosting/buttercream
Red fondant
Black fondant
White fondant
Liquorice pieces
Gummy bears (or other red/yellow candy)
Cookie/Cake Icing (for decoration)
Glass
I also used fondant adhesive and a fondant roller which are handy, but not essential (you can use a little water instead as an adhesive). Also, I find that a pizza cutter is great for cutting fondant!
First step, hide the candies!

1. Bake four layers of cake, using the square cake tin. I tried to make two of the layers red, but I think I would have needed a gallon of food colouring, it stayed resolutely pink!
2. Once cooled, level your layers and then cut a hole in the middle of the bottom two layers of cake and fill with red/yellow gummy bears.
3. Layer your cake, I used buttercream to fill.
Then you are ready to ice your cake.


4. Dirty ice your cake, I used buttercream. I do this in sections so that it doesn’t have any time to harden before I stick the fondant on.
5. Roll out and cut a square of red fondant that is just slightly bigger than a side of your cake, and place onto the cake.
6. Continue around the cake until all four sides are covered.
7. Lastly, cut a square to fit the top of the cake.I’m sure that a professional would manage to cover the cake in one go so that it all looks much neater, but by cutting the edges carefully and using fondant adhesive, I got pretty neat joins!

8. Next, roll out strips of white fondant to make the band that goes around the middle of the block. Again, I did this in stages and used fondant adhesive to stick it to the side of the cake.
Now it’s time to decorate!
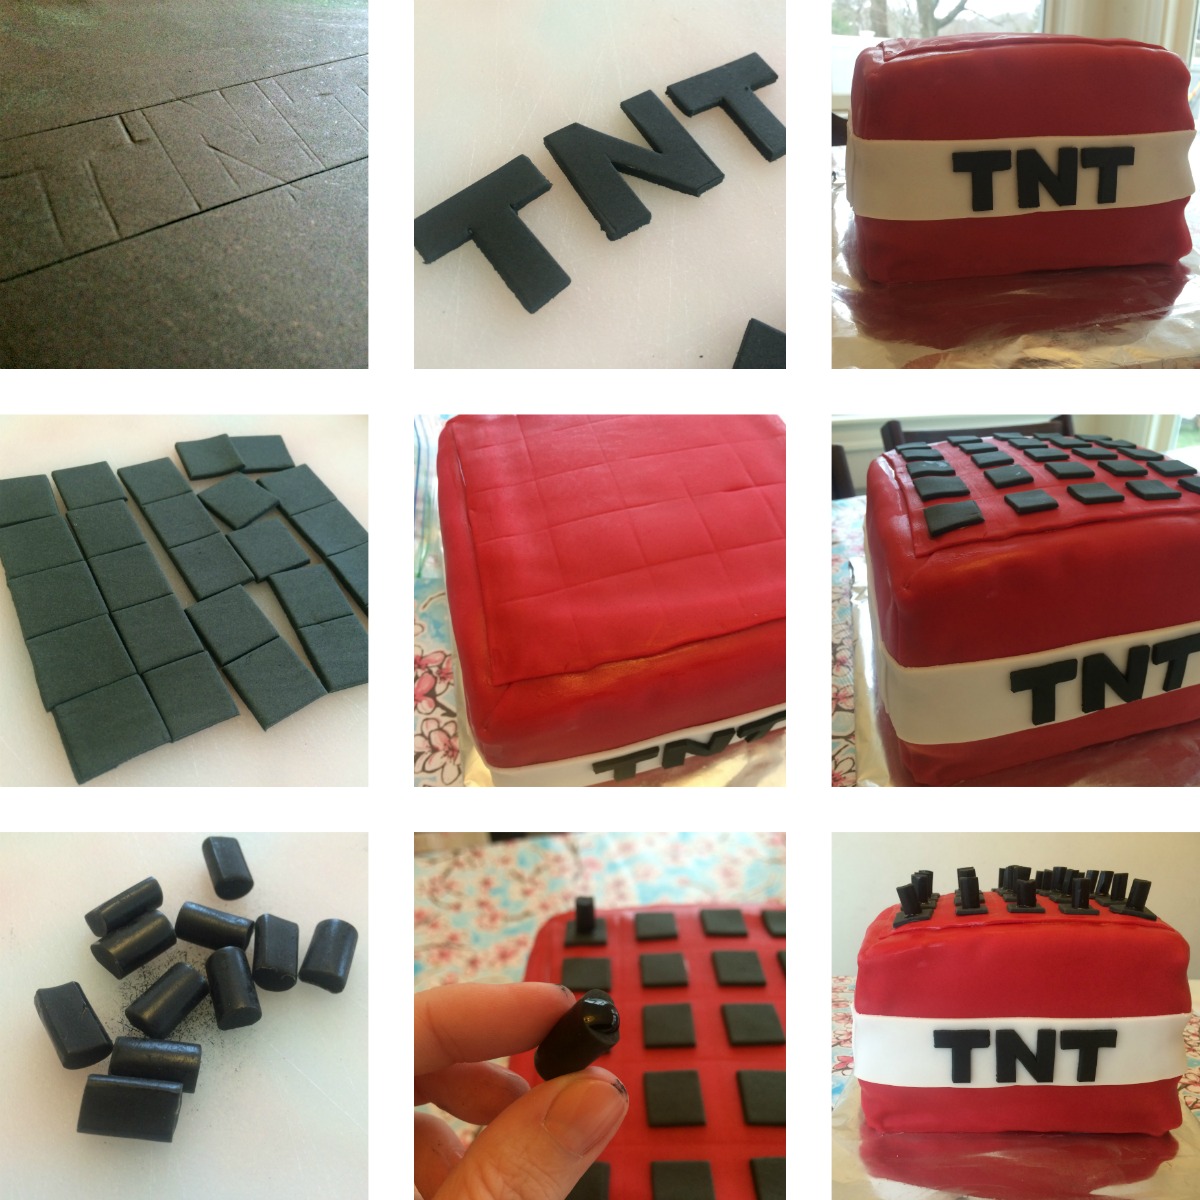
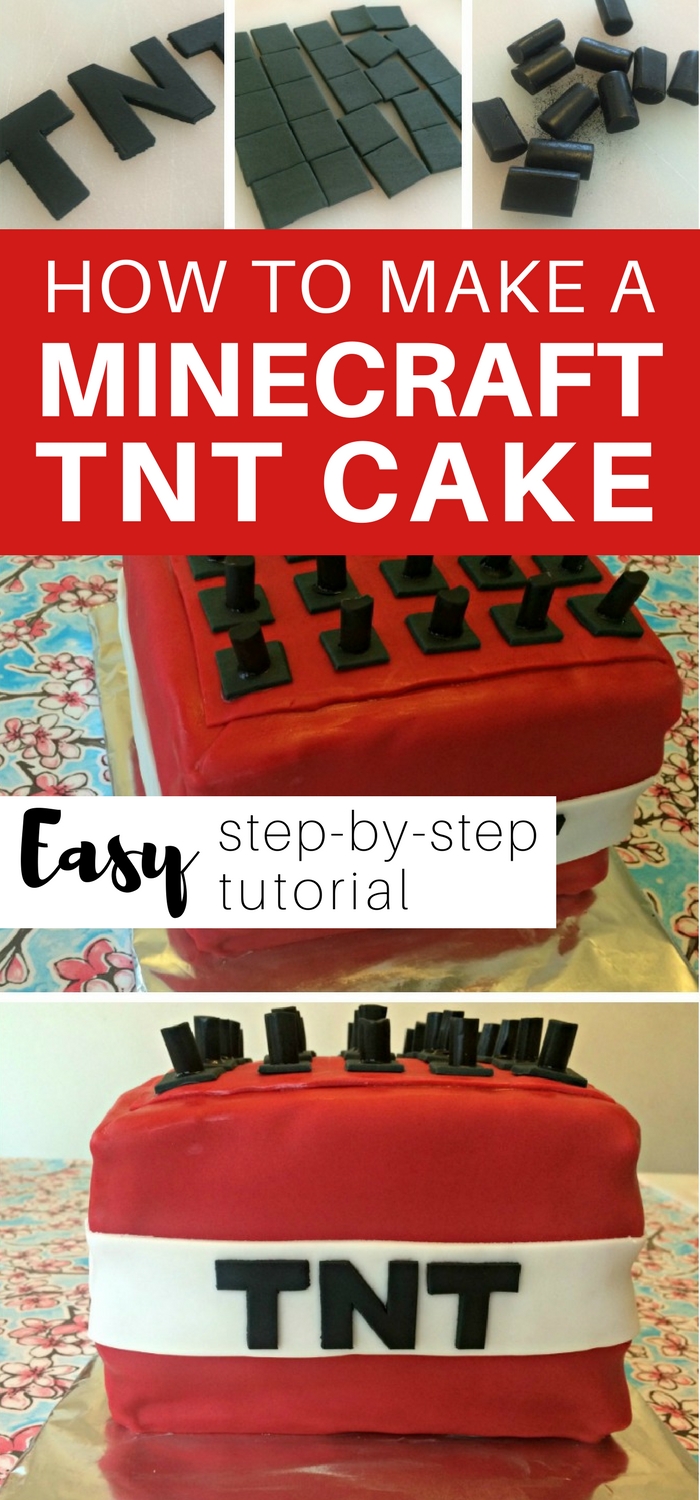
9. Roll out a strip of black fondant and mark out the letters T N T. I used a ruler to measure these out neatly so that the letters were even.
10. I wanted the square for the fuses on the top of the cake to be grey rather than black so I mixed some black and white fondant together. I went 50/50 on the amounts but I would suggest 70/30 white to black to get a better grey. Mine still looked too black!
11. Again, using a ruler to measure it out, I scored the top of the cake into a five by five grid (to give the effect of sticks of TNT). I then rolled out the grey fondant, measured and cut out 25 equal squares.
12. Using fondant adhesive, I stuck stick the grey squares into the middle of each square in the grid.
13. Using black cookie icing I then stuck a liquorice piece ‘fuse’ on to each square.
In retrospect I should have scored the sides of the cake too, to define the TNT sticks better. One of the children at the party kindly pointed this out to me! In fact, if I was making this cake again I would use an edible marker to draw on to the sides/top of the cake to give a better effect.
Despite the cake not being quite accurate enough for the Minecraft connoisseurs, it was a success and my son loved it!


The hidden candies were a hit too :)

I absolutely love to see my kids faces when I bring out a cake like this, and decorating them never takes me as long as I think it might. And, it is definitely worth all the effort.
Now to work out what to make for my older sons tenth birthday next month! Suggestions on a postcard please :)
Like this? Here are some more ideas for you to try!


FAB!!! I am about to make a Minecraft cake for Friday!
This piñata cake idea is brilliant. I love that you used gummy bears for the “explosion” inside. I tried a similar surprise cake for my nephew, and the look on his face when we cut it open was priceless.Jessica U.
Wow, you are so talented at making themed cakes!! It’s not a skill I possess sadly (I’m not great in the kitchen at all) but I totally love how creative you are x
This cake looks amazing I’m pretty rubbish at making cakes. I love the idea of the gummy bears coming out ofvthe bottom of the cake.
this looks great! my two are a little young for minecraft but I love the hidden candy idea :)
Wow this cake is awesome! It looks amazing and not too hard to make? We’re planning an end of school/ preschool party in the summer seeing as Bella finishes preschool and Eva finishes primary school so this cake would be perfect as the two older ones are Minecraft obsessed! Is it as big in the US as it is here? They literally watch Dan TDM all day!! Haha. Thanks so much for sharing this xx
This is amazing!! I have a minecraft fan but no patience for this. Well done.
This looks great for a minecraft fan, looks like you put a lot of hard work into it. Defintiely requires some patience, hats off to you! x
This looks amazing, well done. My two are too young for minecraft at the moment, but I am loving the gummy bear addition! So clever! x
Oh wow what a fantastic cake Sara, so creative. I have never tried my hand at making cakes with icing like this but it looks like it requires a lot of skill and creativity to get it right. I love the sweets in the middle of the cake! Its lovely x
thanks for this. My version isn’t quite so neat but it provided inspiration!
I’m glad it was useful! Always lovely to hear when someone has used one of my tutorials, so thank you!
Hello how many people does this serve?
Kiley, I’m so sorry, I’ve only just noticed this comment! I served this at a party of 20 kids and it was perfect.
I’m going to attempt making the Minecraft Dynamite cake for my nephew’s party this weekend. Fingers crossed that it turns out well. :)
Such a creative idea! The cake looks amazing too! Thanks for sharing. I might consider making it too.
Thank you!