
Last Updated:
Coming up with new ideas for birthday cakes can be a challenge. Coming up with simple, easy to make cakes even more so! In this tutorial, learn how to make a Princess Poppy Trolls cake, which could be easily adapted to any of your favorite trolls!
This Princess Poppy Trolls cake looks impressive, but it’s genuinely achievable even if you’ve never worked with fondant before. The secret is the pull-apart cupcake hair, no sculpting or carving required, just frosted cupcakes arranged around a round cake to create Poppy’s iconic hairstyle. It serves itself at parties too, which is a bonus.
*Affiliate Disclosure: I may be compensated if you purchase through affiliate links on this site. As an Amazon Associate, I earn from qualifying purchases*
Every time I get in to the car with my daughter the refrain from the back is the same: Trolls soundtrack please mummy. It’s on a loop! When it came time to write a list for her birthday Trolls, and especially Princess Poppy, featured heavily.
After making a Barbie Princess Cake for my daughter last year, I had my work cut out to come up with something this year. After much debate – castles, Frozen, mermaids, fairies – we had settled on a Princess Poppy Trolls cake. But, how?
Of course, I consulted Pinterest and there are a lot of beautiful cakes, but none that jumped out at me.
There were a few reasons for this: I wanted to make Princess Poppy but my skills don’t extend to full-on sculpture with fondant, I wanted it to be quick and easy to serve at her birthday party, I wanted to use a mix of frosting and fondant.
After some brainstorming and sketching, this idea was born. A princess poppy cake with pull-apart cupcake hair… Then, I just had to make it! And now you can too, with step by step instructions.
BONUS: Download my free printable Princess Poppy face template (link at the bottom of this post). Printed at US Letter or A4 size, it fits an 8–9 inch round cake perfectly.
How to make a Princess Poppy Trolls cake
Materials
- One 8-inch round cake: I used an 8-inch Wilton tin, though a 9-inch works too [I use these Wilton tins and have them in a variety of sizes!]. A standard white cake mix (Pillsbury works well) is perfectly fine here, no need to bake from scratch unless you want to.
- 29 cupcakes: 27 for the hair and 2 for the ears. Two standard cupcake/muffin tins make baking faster. If you’re catering for a smaller group, you can reduce the number of hair cupcakes, or switch to mini cupcakes to keep the same layout with a smaller footprint. [It’s handy to have two cupcake/muffin tins to make baking the cupcakes easier and faster!]
- Pale pink fondant (~8oz): I used Sweetshop brand, but Wilton works just as well. Ready-made pale pink is widely available, but if you can only find white, add gel food coloring a tiny drop at a time until you reach the right shade, expect slightly pink fingers! You’ll only need small amounts of the other colors (bright pink, black, white, blue and green) for the features and headband, so small tubs or leftover scraps from previous cakes are fine. [This is a good white fondant for a base, and these are good gel food dyes.]
- Pink frosting for the hair (~32oz / 2 tubs): I used Pillsbury Hot Pink Vanilla Funfetti frosting (just without the sprinkles from the lid!). In the UK, or if you prefer, homemade buttercream works beautifully and is less sweet than US canned frosting, just tint it with pink gel food coloring. Two standard tubs of ready-made frosting is the right quantity for 27 cupcakes.
- White/vanilla frosting for the crumb coat: one standard tub is plenty. Homemade buttercream works equally well here.
- Large cake board (15″ x 30″): I used an off-cut of wood, but two or three layers of stiff cardboard (cut from the sides of a large cardboard box) covered in aluminum foil works perfectly. Foam board (the kind used for posters) covered in foil is another great option, as several readers have suggested. You need something sturdy enough to support the weight of the round cake plus 29 cupcakes, so don’t skimp on the layers if using cardboard.
- Fondant adhesive: handy but not essential, a tiny dab of water works as an alternative.
- Fondant roller and fondant-cutting/decorating tools: a small sharp knife is a perfectly good substitute for specialist fondant tools.
- A printable template for Poppy’s face: download the free template at the bottom of this post. Printed at standard US Letter or A4 size, it fits an 8–9 inch round cake perfectly. This makes cutting out her features much easier, don’t skip it!
Method
1. Once you have baked your cake and cupcakes, leave them to cool and then lay them out to finalize the number of cupcakes that you want to use.
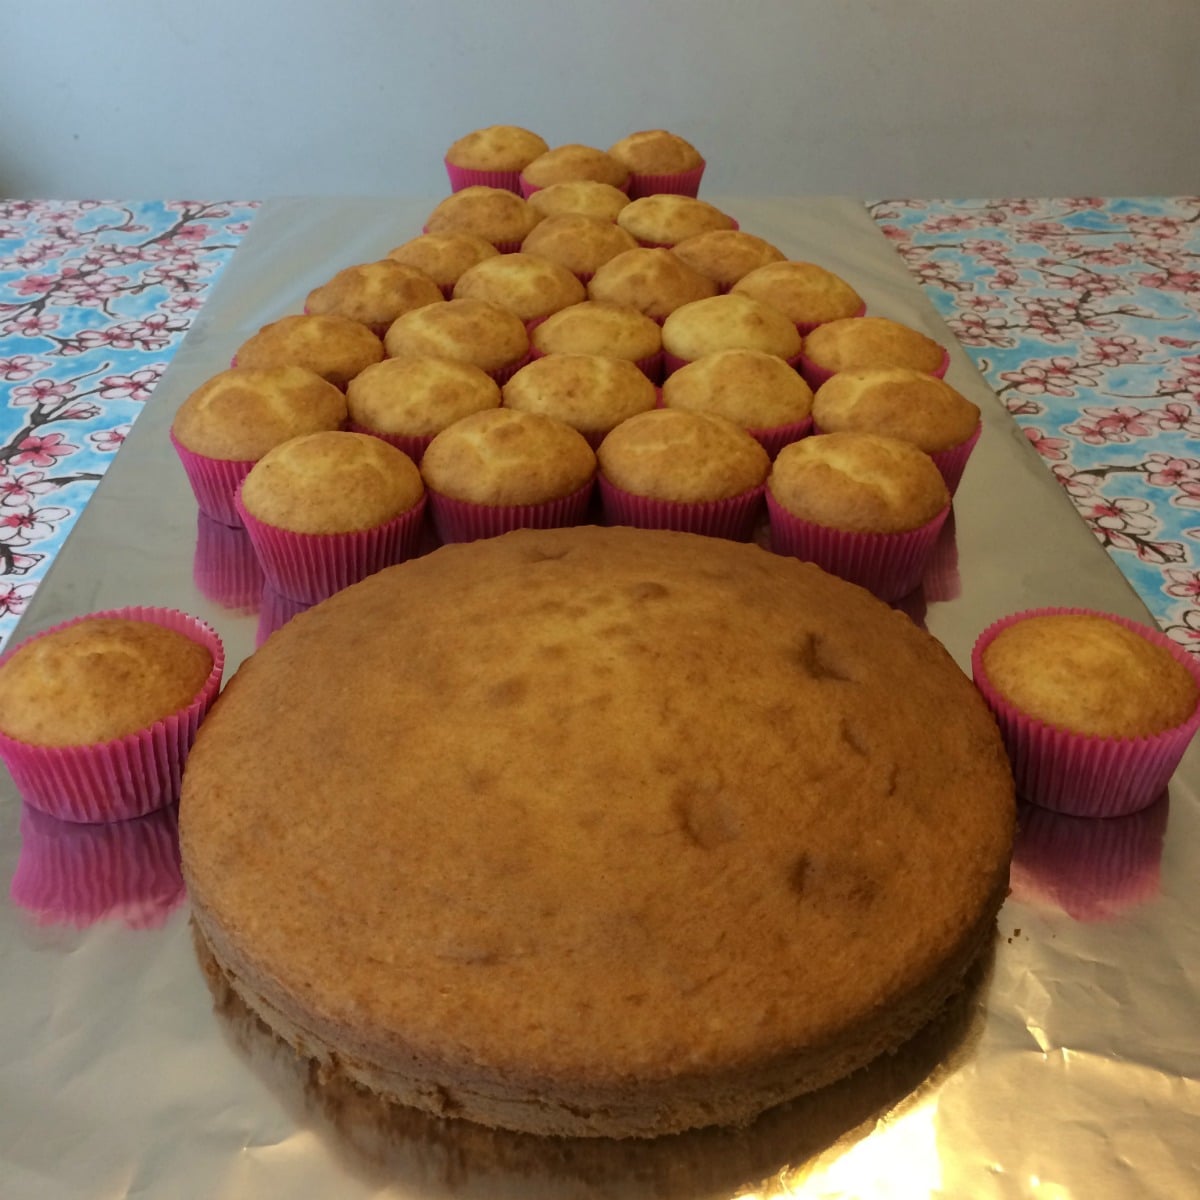

The Face
Once the cakes are completely cool, you’re ready to start the decoration.


2. Roll out the pale pink fondant until it is large enough to more than cover the cake.
3. Dirty ice the cake, I used vanilla frosting.
4. Lay the sheet of pink fondant over the cake, smooth it out and then start trimming. Cut it slightly larger than you think you need and then ‘tuck’ it in neatly under the cake. Work your way around the cake until it is completely covered.
5. Using a round cookie cutter (or similar) cut out two rounds big enough to cover two of the cupcakes to make the ears, dirty ice two cupcakes and top with fondant.

6. Take your picture of Princess Poppy and carefully cut out her eyes. Keep the rest of her face intact as you will use this to ‘mark’ where her eyes should go on the cake before placing them.
7. Using the cut-out eyes as a template, cut out the black shape of eyes/eyelashes.
8. Next, cut out the white circle and use it as a template to cut out the required fondant.
9. Repeat with the pink and blacks circles, and then lastly roll two small balls of white fondant for the highlights.
10. Using a little fondant adhesive, layer the elements of the eyes until you have two complete eyes.

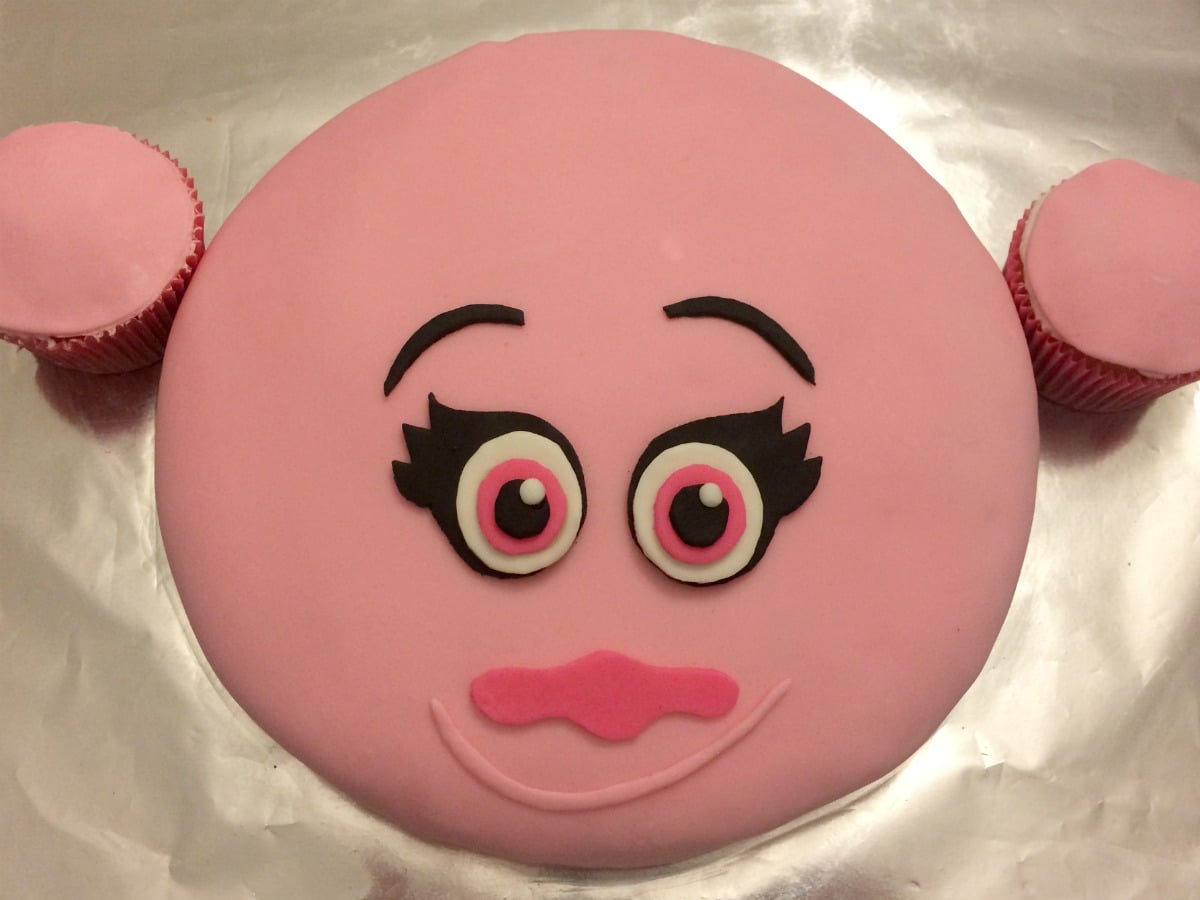
11. Using the print out of Poppy’s face (which will now have two holes in it where the eyes used to be!) mark the locations for the eyes lightly on the cake, then stick the completed eyes in place with a little fondant adhesive.
12. Using the same process, cut out her nose and her eyebrows from the print-out and then from fondant, again using the holes in the print-out to mark their locations on the cake.
13. For her mouth, I just made a thin roll of fondant and gave her a little smile!
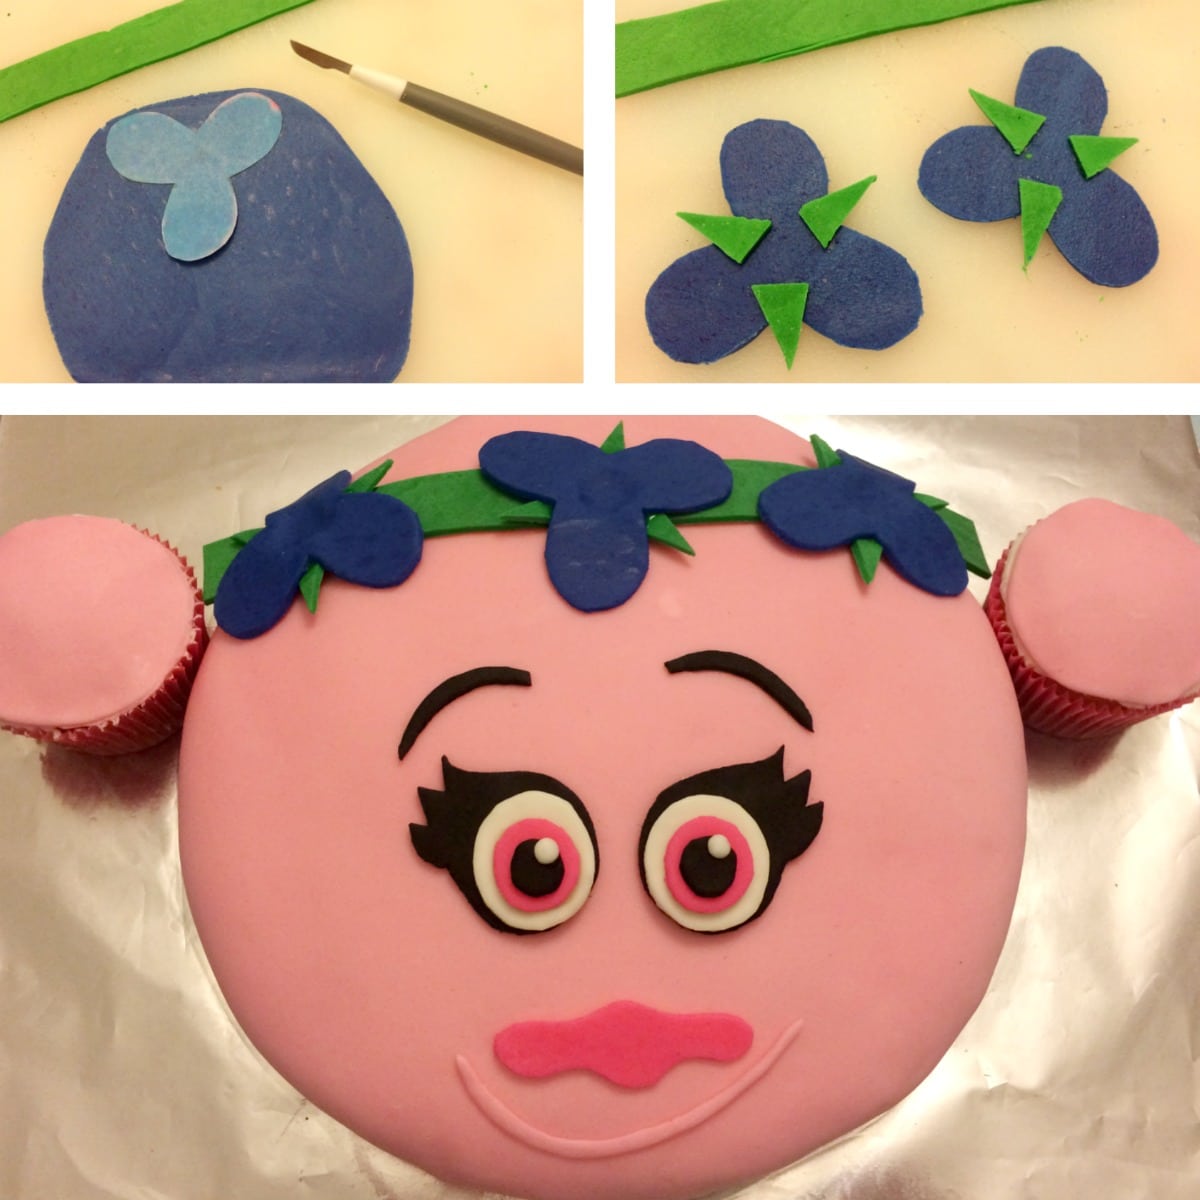
14. Use the same process to make her headband. Roll and cut a strip of green fondant long enough to lay over her hair, and then cut out small green leaves and blue flowers. Layer the leaves and flowers as shown above, stick and leave to dry. Then, lay this to one side to use later.
The Hair
You are now ready to frost her ‘hair’. Lay the cupcakes out into their final positions. You want them pushed as tightly as possible against each other to make frosting the gaps easier.


15. Firstly, add her fringe/bangs to her face. I used a palette knife and marked out where I wanted her fringe/bangs to go and then filled in with the frosting. Use the spreading action to create continuous lines in the direction her hair would fall.

16. Then start icing the cupcakes! Start at the head and work your way to the end of her hair. The cupcakes will want to move, popping a blob of frosting on the bottom of each one should help keep them in place, but use one hand to keep them in place if need be as you frost each line of cupcakes. Again use the palette knife to create sweeps of hair as you go. Work your way all the way up to the top and you will soon have Poppy’s trademark hairstyle. Lay on her headband and your work is done!


Tips and Tricks
On timing and making ahead:
Bake the cake and cupcakes the day before the party, they store well at room temperature in an airtight container or covered box. Do all the fondant work on the face the evening before too, then cover and leave out overnight. Frost the cupcakes the morning of the party. This spreads the work out nicely and means you’re not doing everything at once.
On decorating time:
Allow roughly 3.5 hours in total, about an hour for baking (plus cooling time), an hour and a half for the fondant face, and around 30 minutes for frosting the cupcakes. Factor in cooling time and don’t try to rush it, fondant over a warm cake is a headache.
On storing and transporting:
The finished cake won’t fit in a fridge, and it doesn’t need to, cake stored at room temperature once iced is perfectly fine, assuming you’re not in a heatwave. Cover it with a large box until you’re ready to serve. If you’re transporting it, assemble the cupcakes at your destination rather than trying to move them already arranged.
On heat and outdoor parties:
Fondant doesn’t love direct sunlight or high temperatures, it gets stickier and harder to cut when warm. If you’re serving outdoors in summer, keep the cake in the shade and covered for as long as possible before serving. The fondant won’t melt, but it may drag on the knife when cutting. Several readers have successfully served this cake at outdoor summer parties without disaster!
On keeping cupcakes in place:
The cupcakes will try to slide around as you frost them. Put a small blob of frosting on the base of each one before placing it on the board, it acts as a glue and keeps everything where it should be. Use one hand to hold each cupcake steady as you frost it with the other.
On frosting the hair:
Start at the head end and work outward toward the tips of the hair. Use a palette knife with sweeping strokes in the direction her hair falls, this creates the natural hair texture. Work across a row at a time, filling the gaps between cupcakes as you go.
If you don’t have or don’t like fondant:
Several readers have made this cake entirely in frosting with great results. For the face, warm the frosting slightly so it spreads smoothly, and use ready-made writing icing (e.g. Wilton or Betty Crocker) or piped buttercream for the features. For the eyes specifically, fondant is easier to cut precisely, but if you’d rather avoid it entirely, piped icing or even edible printed decorations work well.
On cost:
Expect to spend around $20-$30 using ready-made cake mixes and canned frosting. The fondant is the biggest outlay, roughly $8 for the pale pink and around $4 per small tub for other colors. Making your own buttercream and sponge from scratch brings the cost down considerably. Either way, it compares very favorably to a professionally made custom cake, which would typically run to $100 or more.
If your child loves Minecraft, my Minecraft Diamond Sword cupcake cake uses the same pull-apart cupcake technique and is just as easy to serve at a party!
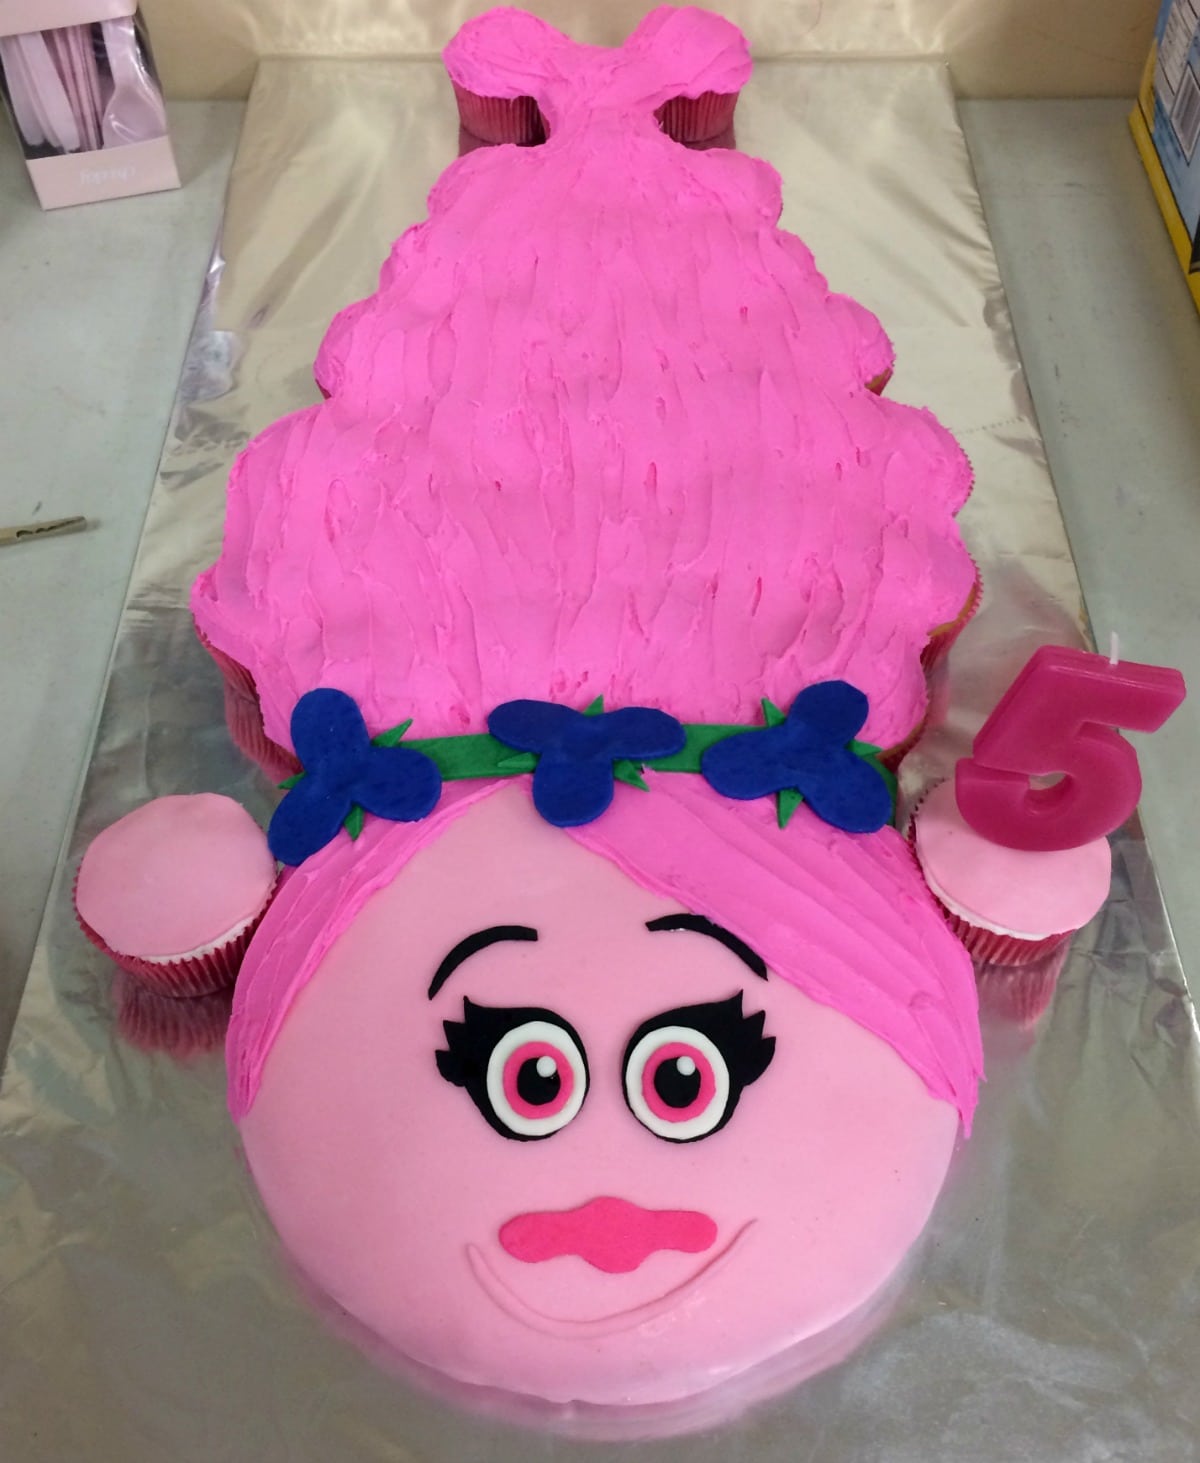
My daughter loved her cake, and it was a big hit at her birthday party. We served the cupcakes to the kids, and it was perfect. It was so quick and easy to serve too, which at a party with 20 kids, all clamoring for cake, is a very good thing!
And Princess Poppy’s ear was a perfect spot for a candle :)
Frequently Asked Questions
Ready to make your own cake? Here are some of the questions I’ve been asked most often, along with my answers!
Let me know if you have any additional questions in the comments, I’m happy to help, and let me know if you try making it!
Feel free to download this printable template which will (hopefully!) help with Poppy’s face… printed out at standard US letter size (or A4), the features will fit an 8 or 9 inch round cake: How to make a Princess Poppy Cake with pull-apart cupcake hair – PRINTABLE TEMPLATE FOR FACE



That is a work of art!!
Now I want a cupcake!
Thank you :)
How did u make the cake and cupcakes stay on the board? And where did you purchase a board that big? I couldnt find one.
Hi Madelyn, apologies for the slow response! Summer vacation! The cakes actually stayed on, no problem, but if you’re worried you can put a small blob of frosting under each cake to ‘stick’ them to the board to keep them from sliding. For the board, I happened to have an off cut of wood just the right size, but in the past I have made a board from the sides of an old cardboard box, cut to size, using two/three layers to make it stiff enough. I then covered it with aluminium foil. Hope that helps!
I bought a foam board (used for posters?), and covered with a strip of aluminum foil.
That’s a perfect solution!
Love this cake! My friend is going to make it for my daughter’s birthday this weekend. Could you tell me the dimensions of the cake board? I’ve got a hunk of wood I think will work, but not sure it’s quite long enough.
Hi Amy! Thank you :) The cake board (piece of wood!) that I used was 15″ x 30″…
I followed your instructions and my cake came out wonderfully!! Thank you so much!
I’m so happy to hear that!
Pingback: Ultimate Trolls Birthday Party Planning Guide
Oh my gosh, that is amazing! Thank you for your detailed step by step instructions, makes it easy to follow. I think I will try this for my daughter’s bday in August!!
I’m so glad you like it. Please do let me know if you make it :)
Do you happen to have a face that you used to copy eyes nose headband? Thanks
Hi Rebecca, I really must create a printable to go with this, it’s on my to-do list! I used Google images, and it was actually quite tricky to find a picture where Poppy was looking straight at you, rather than to the side. In the end I used an image for a ‘Princess Poppy Hair Set’ where she has her chin resting on her hands. If you search for Princess Poppy in Google Images you’ll find it. But, I’ll also let you know when I make that printable and get it uploaded!
I am making this friday… Wish me luck..lol
Good luck! Let me know how you get on :)
Hi do you know what cupcake size cases you used are they just standard size cupcakes .
Thank you going to attempt at making this in January for my daughters 5th birthday. X
Hi Sharon! Yes, I just used standard cupcake cases. Good luck!
This is such a cute cake! Do you know approximate dimensions for the board you used?
Thank you! The board I used was approx 15″ x 30″ :)
Thank you!
What brand icing did you use for the hair? And where did you buy the light pink fondant?
Hi Aubrey! I used Pillsbury Hot Pink Vanilla frosting (it’s a Funfetti one, I just didn’t use the sprinkles in the lid!). I bought the fondant at Michaels – this time I used the Sweetshop brand, but I often use Wilton fondant too. Hope that helps :)
Hi can I ask how much of the frosting did you use for the hair?
I love this cake and I’m going to attempt it in October for my Granddaughter’s 5th birthday, I’ve downloaded the face and pre made that.
I used two tubs of Pillsbury frosting, so about 32oz :) Good luck, let me know how you get on!
I am in love with this, just simply adorable and cannot wait to make this for my granddaughters 5th Birthday!!! YOU ARE AMAZINGLY TALENTED
Thank you so much Tina, that’s very kind of you, I really appreciate you taking the time to comment. Good luck making the cake, and do let me know how you get on!
Pingback: Princess Poppy Cupcake Cake - Garden Seeds and Honey Bees
How much did it cost to do all of it? My daughter loves Poppy I wanted to try to do it for her birthday.
Hi Alisha, I guess that depends on how much you make from scratch versus buying ready-made. For a ready-made solution, it would be two cake mixes, 1 tub of white frosting, two tubs of bright pink frosting and the fondant. The pale pink fondant was about $8, I had scraps of the other colors left over from previous cakes so didn’t need to buy extra, but the small tubs of Sweetshop fondant are around $4.00 each. I would expect around $3.50/$4.00 for the two cake mixes (making your own would be less). Then about $5.00/6.00 for the frosting… Again, making your own buttercream would reduce this. So that would be a total of around $20, depending on how much frosting and fondant you need to buy. The biggest outlay is probably the fondant, as you can easily make the rest from scratch cost effectively.
Having said that, a professionally made cake could set you back anywhere from $50-100, so it’s still quite cost effective! Let me know if you have any other questions.
Hi I live in the UK. Can I use coloured buttercream for the hair instead of frosting. To make the princess Poppy cake. Thanks Kathy
Hi Kathy! Absolutely! In fact, my preference would be to make my own buttercream ordinarily (I find US frosting sooo sweet!) but time was not on my side and the pre-coloured frosting was a real timesaver!
Hi Thanks for getting back. I have to make it for my granddaughter 4th birthday so will use the pink buttercream. Thanks. Kathy Kelly.
What about the face? Would you recommend a icing like royal icing for the face instead of fondant? Never woeked with fondant and not really a lover of it either
I made this cake today for my son’s 3rd birthday! He loved it. Thank you :)
Hi Cat! I’m so glad it was a success. Thank you so much for letting me know, that’s put a big smile on my face :)
I am attending to make this right now.. having a hard time finding a good picture on Google for her face
Hi Jessica, it’s not easy to find a picture of Poppy where she isn’t looking to the side is it! The image I used was for a Princess Poppy Hair Set (if you use that as the search term, you’ll find it right at the top on Google Images). When I blew the image up to be the right size for the cake, it was quite blurry/pixelated, but it was sufficiently clear to use for her eyes/nose etc. I REALLY must get around to making a printable for this post!!
Jessica, it’s probably too late, but I have now uploaded a printable for Poppy’s face :)
Hello, let me start by saying what an amazing cake! I am having a hard time finding the eyes on Google images. Do you think that you would be able to Add a printable template for the eyes? Thank you in advance. Michelle
Michelle, it’s on my list for this weekend! I’ll let you know as soon as I’ve uploaded the image :)
Hello, how can I tell if you upload the template?
I’ve just uploaded it… this is a first for me, so do let me know if you have any problems with it!!
Hi Sara, I am going to (attempt to!) make this cake today, for my daughters 5th birthday party tomorrow morning. Do you think the frosting needs to be put on before the party or is that something I could do today when I do the fondant / face etc… want to leave as little as possible to the last minute! Thanks
Hi Alex, so sorry I just saw this! I frosted the cupcakes in advance of the party and it was fine, I covered the cake with a large box until the party. Hope your daughter has a wonderful birthday!
Plan on making this for my daughter’s 6th birthday the 23rd. My only concern is I’ve never worked with fondant before and we always have her party at the lake and camp which is only like 10 mins from home. I’m guessing my question is what’s the time limit of allowing it to be out in 100 degree weather without it melting because from what I’ve googled fondant doesn’t do well with heat. I’m also assuming I’m probably going to have to make a trip from the lake to home just to get the cake but if you happen to have any other ideas please let me know. Thank you
Hi Daryl, I have been lucky in that I haven’t had to deal with it being too, too hot when I’ve made a cake using fondant, although I have served them over the summer before. I would suggest that you want to limit time in direct sunlight, but as long as you can keep the cake in the shade it should survive long enough to serve! I tend to ice cakes as close to the party as I can, and then keep them as cool as possible, and covered, until I serve them. I’ve never had fondant ‘melt’ but it does get more difficult (stickier) to cut and serve when the weather is hot. Keep the cake covered/shaded for as long as you can, and just be aware that the fondant may stick/drag on the knife when cutting. Hope it all goes well!!
I made this for my granddaughter last weekend and she loved it. All the girls loved her cake.
I did it all in buttercream frosting, I don’t use fondant and everyone liked the way it turned out. Sara’s derections were great to follow.
Thank you for sharing.
Thank you so much for the feedback, I’m glad it was a success!!
Hello Carol, I was wondering if you have a picture of what the cake looks like with out using fondant? I will be making this for my daughter’s birthday in September and never used fondant but wanted to see if frosting looks as good.
How did you figure out how to do the eyes? The size to proportions? Do you have a picture of the cake with buttercream frosting?
I’ve never made fondant. If I buy from the store can I color it myself. If so what are your recommendations to get light pink? I love it I can’t wait to make it.
I was actually able to buy ready-made pale pink fondant (I used Sweetshop brand on this cake, but I often use Wilton fondant too). If you can only get white, it’s quite easy to color BUT add the food dye really slowly, using a TINY drop each time to get the color you want. And expect to end up with slightly pink fingers :)
Do you happen to have the measurements for the board that the cake sits on?
Hi Lacy, the board I used was approx 15″ x 30″ :) Hope that helps!
I am pretty excited to have found this page. A friend originally just shared just the finished creation, my friend with a trolls party soon loved it, so I was going to give this thing a shot, (based off the finished picture) and guesses lol… But now I have more to follow. This cake will be so fun! Thank you for sharing!
Hope you have fun making it, let me know how it goes :)
I am making this for my granddaughters birthday party this weekend. Thank you for making this so much easier with your instructions.
You’re very welcome! Let me know how it goes :)
Just finished making this for a friends granddaughters 3rd birthday. Thank you so much for the awesome tutorial!
You’re very welcome, thank you so much for commenting and letting me know!
I don’t use fondant. Any ideas on other things i could use instead? Looking for really simple ideas. Making for my soon to be 6 yr old who loves Poppy! Thanks.
Hi Tara, that’s a good question! You could easily use smoothed frosting for the main part of the face. Would you consider fondant just for the eyes/nose? Otherwise, you could perhaps use ready-made ‘writing’ icing (Wilton/Cake Mate/Betty Crocker), or your own piped icing, to draw on the main parts of her face (eyebrows, eyelashes and a simple eye shape)? Good luck! Let me know how you get on x
Ok-I got my answer from here. I could use the icing . great. and I would use the fondant for the eyes, etc. however, I was thinking if using Marshmallows that you cut and dip into colored sugar for the flowers and improvising the rest. But I still love your invention, it’s really adorable. Thanks for the tips and showing me how it’s done !!
Hi Margie! First, apologies, we’re on vacation so I’ve only just picked up your comments. Glad you found the answer, I would have suggested this solution to you too, after reading your first question. And, I love the idea of the cut/dipped marshmallows for the flowers :) Let me know how you get on!
Thank you so much for this tutorial! I am making this for my Daughters 3rd bday tomorrow! I am excited for how it will turn out!
Hi Briauna! Good luck, and let me know how it turns out :)
Thank you so much for this design and the template. Worked a treat and my five year old daughter is delighted!
I just want to add – we had the party on the beach this afternoon. The cupcake element was amazing. My daughter loved going round all her friends handing out cakes (and eating spare icing as she went!). Thanks again. Looked great, real wow factor, and pretty easy to achieve for a relative novice.
Hi Amy, you’re very welcome, and thank you so much for the feedback. So glad it was a success and that your daughter had a great party :)
I’m going to make this for my goddaughter and niece’s joint birthday party they will be 6 and 2. Rebecca the 2 year old is gluten free. I’ve done gluten free cupcakes before so the sponge is fine. I know the buttercream is ok but do you know if the colourings and fondants are gluten free??
Hi Chris, I can’t confirm that the fondant or colouring that I used are gluten free as it doesn’t explicitly state so on the packaging. I used Sweetshop and Wilton fondant and Wilton gel food colourings. Doing a quick google search suggests that food colouring and fondant are likely to be gluten free, but the over-riding advice is to check the packaging or call the brand. Sorry I can’t be more help, I wouldn’t want to risk giving you the wrong information on something this important!
Pingback: The BEST Cupcake Cake Ideas! - Kitchen Fun With My 3 Sons
How much of the pale pink fondant do I need to buy? I see the others are just scraps. I also see you uploaded the template. Where do I find that?
Thanks. My daughter us super excited for me to make this!
Hi Kim, I used approximately 8oz of the pale pink fondant to cover the face and ears. The template is a clickable text link right at the bottom of the post, you should be able to download it just by clicking the link (‘How to make a Princess Poppy cake with pull-apart cupcake hair – Printable Template for Face’). Let me know if you have problems and I can email you a copy!
This coming weekend, our church activity is Pinewood Derby for the women (no help from men in building the cars) and cake decorating for the men (no help from women). My husband happen to see this on Facebook (someone was sharing it around) and asked me “What is fondant?” When I asked why, he told me about this cake and said this is the one he wants to make. Mind you, this is the man who bakes a cake in at 9 x 13 pan, frosts it in the pan and just to make it fancy puts chocolate sprinkles on top.
Pray for me.
Ha! This made me smile, I’ll be thinking of you :) Do let me know how he gets on!!
Hi Hun great cake. My daughter looked on google images and found a trolls cake she wanted, I typed in how to make it and your step by step instructions came up to the exact cake she wants. WINNING!!!! Anyways I have a tiny fridge, did you just do it all the morning of the party and leave it out?? Obviously won’t fit in a fridge?? Xo
Hi Claire! Thank you :) No, it definitely won’t fit in a fridge! Cake can be stored at room temperature once it’s iced (assuming you’re not having a heatwave!), so I baked the day before the party and did all the fondant work on the face, covered it and left it out overnight. I boxed up the cupcakes, then laid them out and did all the frosting the morning of the party. Hope this helps x
Hi! Thanks so much for this idea! You said we could scale down to fit guest size. What size pan do you recommend and how many cupcakes for a small party? 10 people probably. Thank you so much!
Hi Marie,
I’m so sorry, I’ve been on vacation so hadn’t seen this question. Hmmm, when I made the big cake, I drew it all out to begin with to get the right number of cupcakes for the number of guests… If it was me, for ten guests, I would probably do at least 15 cupcakes, to allow people to have more than one if they wanted (or didn’t like fondant). This version of the cake used a 9in cake pan, but for a smaller cake I might try a 6 or 7in pan instead, and then play around with the layout of the cupcakes (or you could use the same number/layout that I did, but do mini cupcakes instead?). Having said that, if you don’t have a smaller cake tin, you could simply alter the shape of her hair to use fewer cupcakes, Poppy does have various different hair styles! I’m going to have to draw this now :)
Thanks for such a detailed post. I would love to share pics of the one I made with you. It came out amazing !
Thank you! I would love to see photos :)
I made this cake for my twin girls’ 3rd birthday. It turned out amazing! I even made fondant for the first time. Great tutorial
Thank you! I’m glad it was a success :)
Do you recommend can frosting or buttercream for the “crumb” coat under fondant for the head ?
Hi Heather, my preference is always for homemade buttercream, but if I run out of time (which I often do!) then I will use the can frosting/buttercream. Either is fine :)
This is so sweet! And looks…do-able. Might have to give this a go for my daughter’s next birthday.
Hi Vanessa, thank you! And good luck :)
I am making it this weekend!! It’s the cutest poppy cake I have ever seen and my daughter is really excited!!! Love the step by step instructions and I’m looking forward to the final result!! Thank you
Hi Sarah, thank you so much! I hope you had fun making Poppy :)
Thank you for the instructions! I just finished mine (hate I can’t add a pic!) It luckily wasn’t a Pinterest fail thanks to you! My daughter is so excited for tomorrow.
Hi Melissa, I’m so glad that your cake was a success, it makes my day to hear that!
I dont like fondant. I used store bought frosting. I warmed up the frosting for the face so it would be smooth. I used icing for the face. I was surprised how easy this cake was to make.
Hi Patrice, thank you so much for the feedback and the tip for using frosting instead :)
Hi I’m going to try and make this cake for my granddaughters 3rd birthday . What mixture did you use for the sponge going to make my own but wasn’t sure what quality to use
Hi Julie, I have to admit I cheated with a cake mix for this cake! I just used a standard white cake mix (Pillsbury on this occasion) :)
Love this idea. Never worked with fondant before so had to improvise on the eyes a little but I think it worked. Thanks for the idea everyone loved it!!
Hi Michelle, thank you so much, and I’m so glad it was a success!
About how many hours did it take to make this?
Hi Kimberley! The cake/cupcakes took about an hour and a half all in, including baking time, there’s a lot of cupcakes! Plus cooling time on top of that, of course. Decorating the face took me about an hour and a half, and frosting the cupcakes/hair took about thirty minutes. Hope that helps!
Pingback: 15 Birthday Cupcake Cake Ideas [recipes] | Tip Junkie
Pingback: Super leuke ideeën voor een Trolls feestje. Na het gelijknamige film.
Made your ‘Poppy’ cake today for Granddaughters 4th Birthday tomorrow … She will love it …Thank you so much – your instructions were easy to follow.
You’re very welcome!!
Pingback: The BEST Trolls Party Food Ideas! | Brownie Bites Blog
I made this for my daughter’s 3rd birthday this past weekend and it was a HUGE hit for both kids and adults!! My next project is the My Little Pony cake for my oldest daughter’s 6th birthday in December. Thanks so much!!
I’m so pleased it was a success! Let me know how the My Little Pony cake goes too :)
Pingback: Throw the Very Best Trolls Birthday Party There Ever Was!
Pingback: 20 Of the Best Ideas for Poppy Birthday Cake - Birthday Party Ideas | Birthday Cake Card and Invitation Ideas
I’m so happy I came across this. I have made this for my daughters 4th birthday. 1st time I’ve attempted anything like this and your instructions were amazing I followed it step by step and came out with a great cake. So thank you!!!
Thank you so much for the lovely comment. I’m glad that the instructions worked well for you! Hope your daughter enjoyed her birthday :)
Hi Sara, can you tell me if you used the 8-9inch pan in this one? I know you said it’s compatible with both but I want to try to be a precise as I can be :) so excited to make this cake for my future niece and I appreciate your detailed instructions as well!
Hi! I’m so sorry I didn’t see this sooner, I took a break over the holidays and really switched off! It was a while ago now (and I can’t find a photo with the tins in it!), but I’m fairly sure I used an 8 inch tin! I really think either would work though! I hope I’m not too late with an answer!
This is not baking, this is craftswomanship haha. I will definitely attempt this but almost sure that it will be a failure.
Ha, thank you :) I’m sure you’ll do great!!
Thank you so, so much for this. I asked my 4yo if he was happy with his cake and he said “it’s perfect Mama” and it was. This is such an easy to follow guide. Thank you!!!
You’re very welcome!!